Everyone's Skoolie Windows Leak!
Removing, Flipping and Cleaning
Removing the skoolie windows was fairly easy, once we removed all of the side paneling below them. After that, we only needed to remove 6 screws in order to pull the windows out of the bus walls. We took 2 of the 23 windows to experiment with. Sitting in the garage, we took apart the frames and pulled out the glass.
Watching Jake’s video and trying to see how to put the frames back together upside and backwards, we came to the stark realization that our skoolie windows can’t be flipped in the same way. Our window frames will not fit into the bus walls in a different orientation (upside down, flipped around). We quickly gave up on flipping them and resigned ourselves to just cleaning and re-installing them. We scraped off some of the old adhesive seals along the bottom edge and hosed them off.
Re-installation of the skoolie windows was a bigger challenge than we expected. For re-sealing, we purchased butyl tape for the bottom seal and silicone caulking for the rest. We tried the butyl tape on one window, but struggled to get it to sit properly. We then switched to adhesive foam weather strips for the bottom seal, since it’s thicker and squishier. It’s more forgiving when the bottom lip of the bus wall frame isn’t at exactly the right height.


Mistakes and Water Inside Our Skoolie


We came to understand two things after we had almost all of the windows back in. First, the foam weather stripping wasn’t a good idea, since it carries water through it, rather than blocking it. Second, we should have kept track of which windows went where. Not all of the frames are the same and they didn’t all fit in the open spot we tried to put them in. Unfortunately, we didn’t realize any of this until we had almost all of the windows back in. The last few windows had to be hammered in and not all of the screws fit. To make up for the foam weather stripping, we applied silicone caulking around the outside edges of the windows.
Next up was our first test for water leaks. CrtrGrl was inside the skoolie with a pencil, while I was outside spraying the bus with a hose. She couldn’t keep up with all of the water that was coming in! There was so much coming in from the windows, that she also couldn’t tell where exactly they were leaking. After the bus dried off, I opened up another tube of silicone caulking and went to town on the outside bottom edge of the windows. I thought that if I put enough on, it couldn’t possibly get through. Another leak test, still more water coming in. More silicone in the bottom corners, less water coming in now, but they still leaked!
Desperation is the Father of Invention
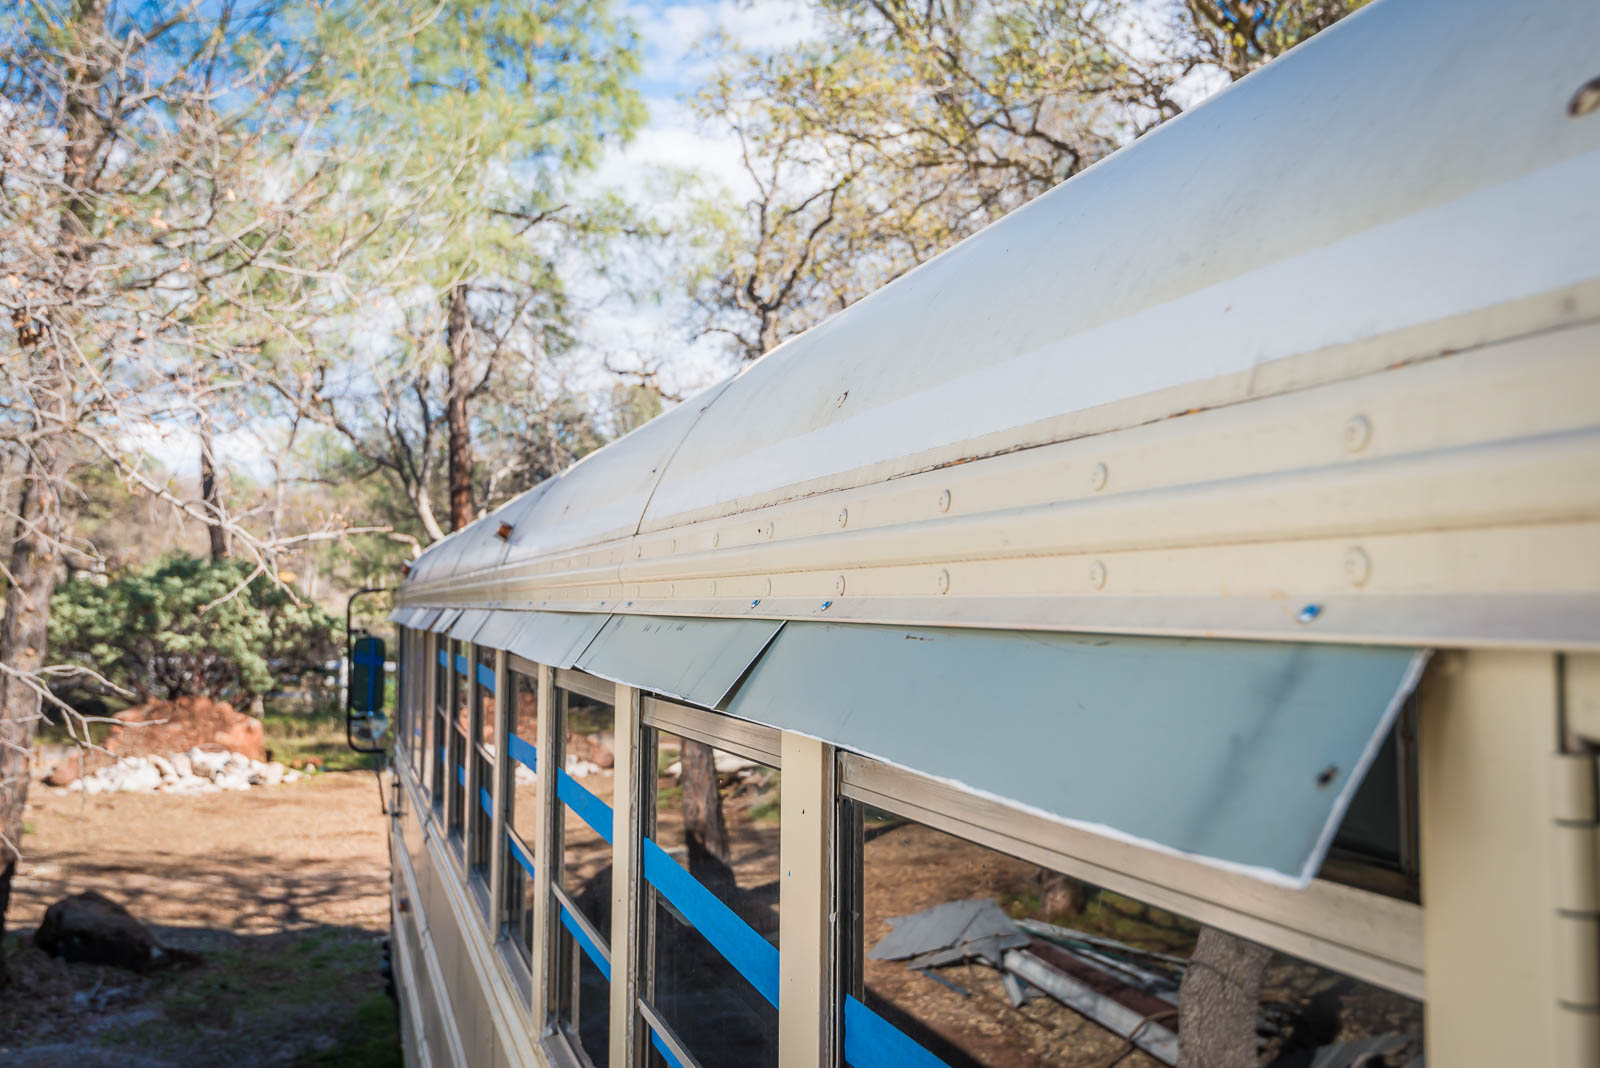
That’s when I’d had enough and realized we were either going to need to remove the windows and start over or come up with a different solution. I noticed that the stock skoolie has a little lip above the windows that directs falling water away from the top/open part of the window. Unfortunately, it seems to drop it straight onto the bottom lip of the window, where our foam weather stripping was and the leaks were coming in from.
What would happen if we kept the water from falling on the bottom edge of the windows altogether? That’s when I came up with the idea of putting eaves on the bus. Gutters would also work, but may not be good at freeway speeds. Estimating with a tape measure, we figured out that a 4 inch width attached to the existing lip above the windows should push the water out far enough. We decided to do one eave per window to make installation easier, so we needed a total of 24 eaves, including the drivers window. The majority would be 28″ long. The driver’s window and last windows on each side would be 34.5″ long. Those lengths provided for some overlap and longer than 28″ would provide for even better overlap.


Since we removed all of the metal ceiling panels from our bus, we had plenty of extra sheet metal to fashion the eaves out of. Using the metal blade on my parent’s table saw, we started cutting metal. Lots of sparks and nervous fingers later, we fashioned a proof of concept for the driver’s window. CrtrGrl tested it out and it fit perfectly! Next we went down to the local hardware store and purchased small screws and nylon locking nuts (Nyloc) to bolt them to the bus.
We spent the next few days cutting metal. Using the metal blade on the table saw, we cut the rough rectangular shapes out of the skoolie ceiling panels. Then I used an angle grinder with a rough sanding pad to get them into the right dimensions with smooth edges. Finally, CrtrGrl painted the edges with metal primer to keep the rust down.


Installing and Testing the Skoolie Eaves
To install the new eaves, I used a trigger clamp at each end to hold each eave to the bus lip, while I drilled holes through both for the screws. For the longer pieces, I used 3 screws and for the rest, I used 2 screws. With the nyloc nuts, each screw was secure and the eaves couldn’t move at all. The angle of the existing bus lip provided a great angle for the eaves to push the water away from the windows.
Once all of the eaves were installed, we tried another simulated rain test. I stood up on a ladder with the hose and sprayed the roof of the bus. The water ran down the sides of the roof and off the eaves. The water didn’t touch the windows! CrtrGrl figured out that we could even have the windows down a little bit in the rain without any water getting in. The rain test was passed, at least rain without wind. Of course, the windows could still leak if the rain is coming down sideways!
The final test was driving with the eaves. Since they just present a very thin profile from the front of the bus, I knew it should be low risk. During the full day of driving the bus from NorCal to Washington, I didn’t notice any issues with the eaves. No weird whistling or flapping. They seemed to be secure and wind-proof. The windows that we replaced the glass with metal inserts were a different story entirely, a story for another day.
CrtrGrl and I hope this detailed description of what we did to fix our skoolie window leaks will help others! We hadn’t seen any other skoolies with them, so we thought we should share how our frustration led to the idea. If your skoolie already has them, let us know in the comments! We’d also love to hear if you were inspired by us to create some of your own and how they worked for you!